Be sure to scroll down and watch the video!
1. After uploading a PDF document into a Docs Management or Miscellaneous Docs Management folder, you will see an icon that looks like a sheet of white paper with a globe 
2. Click on this icon to initiate the SMART edit feature
NOTE: We strongly recommend that you click on the Help icon at the top left of the screen and watch the videos relating to our new Smart eContracts to take full advantage of the many features.
3. Click on the box to the upper left that reads Edit Fields 
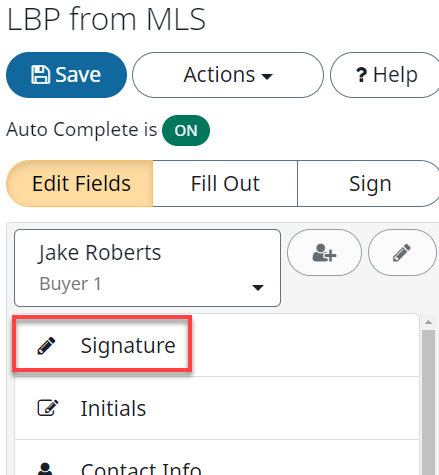
4. Notice the box beneath Edit Fields that will have the Document Owner name. There is a small down arrow to the right of the Document Owner name. Click on that arrow to display the names of participants who are present in the eContact Sheet under any Detailed Transaction.
5. If you need to add a participant or additional signer, click on the green ON next to the words AutoComplete is ON.  This will permit you to disable the AutoComplete feature from the eContact Sheet
6. A pop-up window will be displayed. Click on Turn Off  to disable the AutoComplete feature so you can add a signer
7. Click on the green CONFIRM to confirm your choice to disable AutoComplete
8. You can then click on the person icon  with the plus sign to add a signer. Don`t forget to identify the signer type or create a Custom Signer type.
9. Once you select a participant from the drop down, that participant "owns" all the fields listed beneath his or her name - Signature, Initials, etc.
NOTE: In Miscellaneous Docs Management you will need to add all parties that will be signing the document.
10. Drag and drop the Signature Field to the appropriate place in the PDF.
11. When you drop the Signature Field a Signature Date Field will automatically populate.
12. You can size these fields using the double headed arrow at the edge of the field.
13. You can left click on the fields to display a wrench icon  . When you click on the wrench you can change appearance for fields or date format.
14. On the Signature Field, when you click on the wrench you can Add a Field for Signer Name, so the PDF looks like an eContract with the name printed beneath the signature line.
15. Don`t forget to click on the SAVE button at the top left and watch for the green Saved Successfully banner to display across the top of the screen.
video:2018kb
lang:2022cs
youtube:2018